How to Embed Calendly on Squarespace (Free Plan, Step-by-Step)
If you want people to book time with you without back-and-forth emails, adding Calendly to Squarespace is one of the easiest upgrades you can make. I like Calendly because it's simple, it's beginner-friendly, and the free tier is enough for a basic booking page.
In this post, I'm going to walk through exactly how I embed Calendly on a Squarespace page using an inline embed, and then I'll show you the quick checks I always do on desktop and mobile to make sure the page looks right.
Why I choose Calendly for a Squarespace booking page
When someone lands on your "Book a Call" page, you want the next step to feel obvious. A scheduler helps because it turns "reach out" into "pick a time." Calendly is one of my top three scheduling picks for that job, especially if you're offering a simple discovery call and you don't want to pay for extra features you're not using yet.
Here's why I often recommend Calendly for Squarespace sites:
Free plan works for basics: You can set up a single event type (like a discovery call) without paying.
Embeds cleanly on Squarespace: You can place it right on a page with a code block.
It's simple: The free plan takes very little time to set up, and it’s relatively easy. Some of my least tech-savvy clients have done it!
Another reason I prefer embedding (instead of sending someone to a Calendly link) is trust. Keeping the booking flow on your site feels more consistent, and it's one less click for the person booking.
If you're using my Sway template, it already includes a booking page layout you can swap out quickly, which makes this setup even faster.
For reference, you can always start with the main platform at Calendly scheduling software, then come back and embed once your event is ready.
Step 1: Set up your Calendly event type (using the free plan)
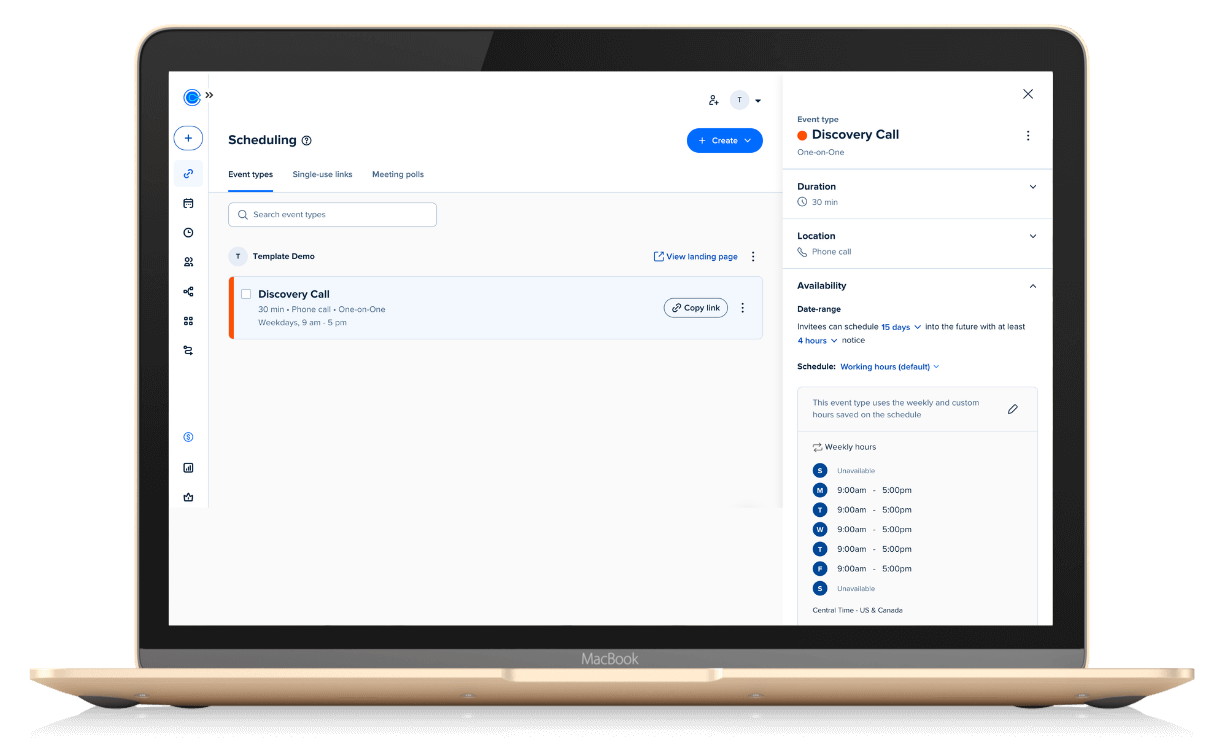
Before you touch Squarespace, set up your event inside Calendly. In my example, I created a simple discovery call. Nothing fancy, no paid features, and no extra event types. That's important because the free plan supports a straightforward setup, which is perfect for a "book a call" page.
When you click into your event in Calendly, you'll see the event details on the right side. This is the screen I use as my starting point every time because it's where I can grab the website embed options.
At this stage, I'm mainly checking:
The event name is clear (for example, "Discovery Call").
The duration is correct.
My availability is set.
Anything else I want the visitor to know is either in Calendly, or I plan to add it as text on my Squarespace page.
I also like to decide ahead of time what the Squarespace page will say above the embed. If I'm going to add a short headline like "Book a free discovery call today," then I don't need Calendly to repeat the same info inside the embed.
Once the event looks right, I'm ready to pull the embed code.
Step 2: Copy the right Calendly embed code (and pick the best embed type)
Calendly gives you a few ways to add scheduling to a website. The trick is choosing the one that works best inside Squarespace, then adjusting a couple settings so you don't end up with duplicate banners and clutter.
Inline embed vs pop-ups (what I use on Squarespace)
Inside your event, click the three dots to the right of the event name, then select Add to website. Calendly will show options like:
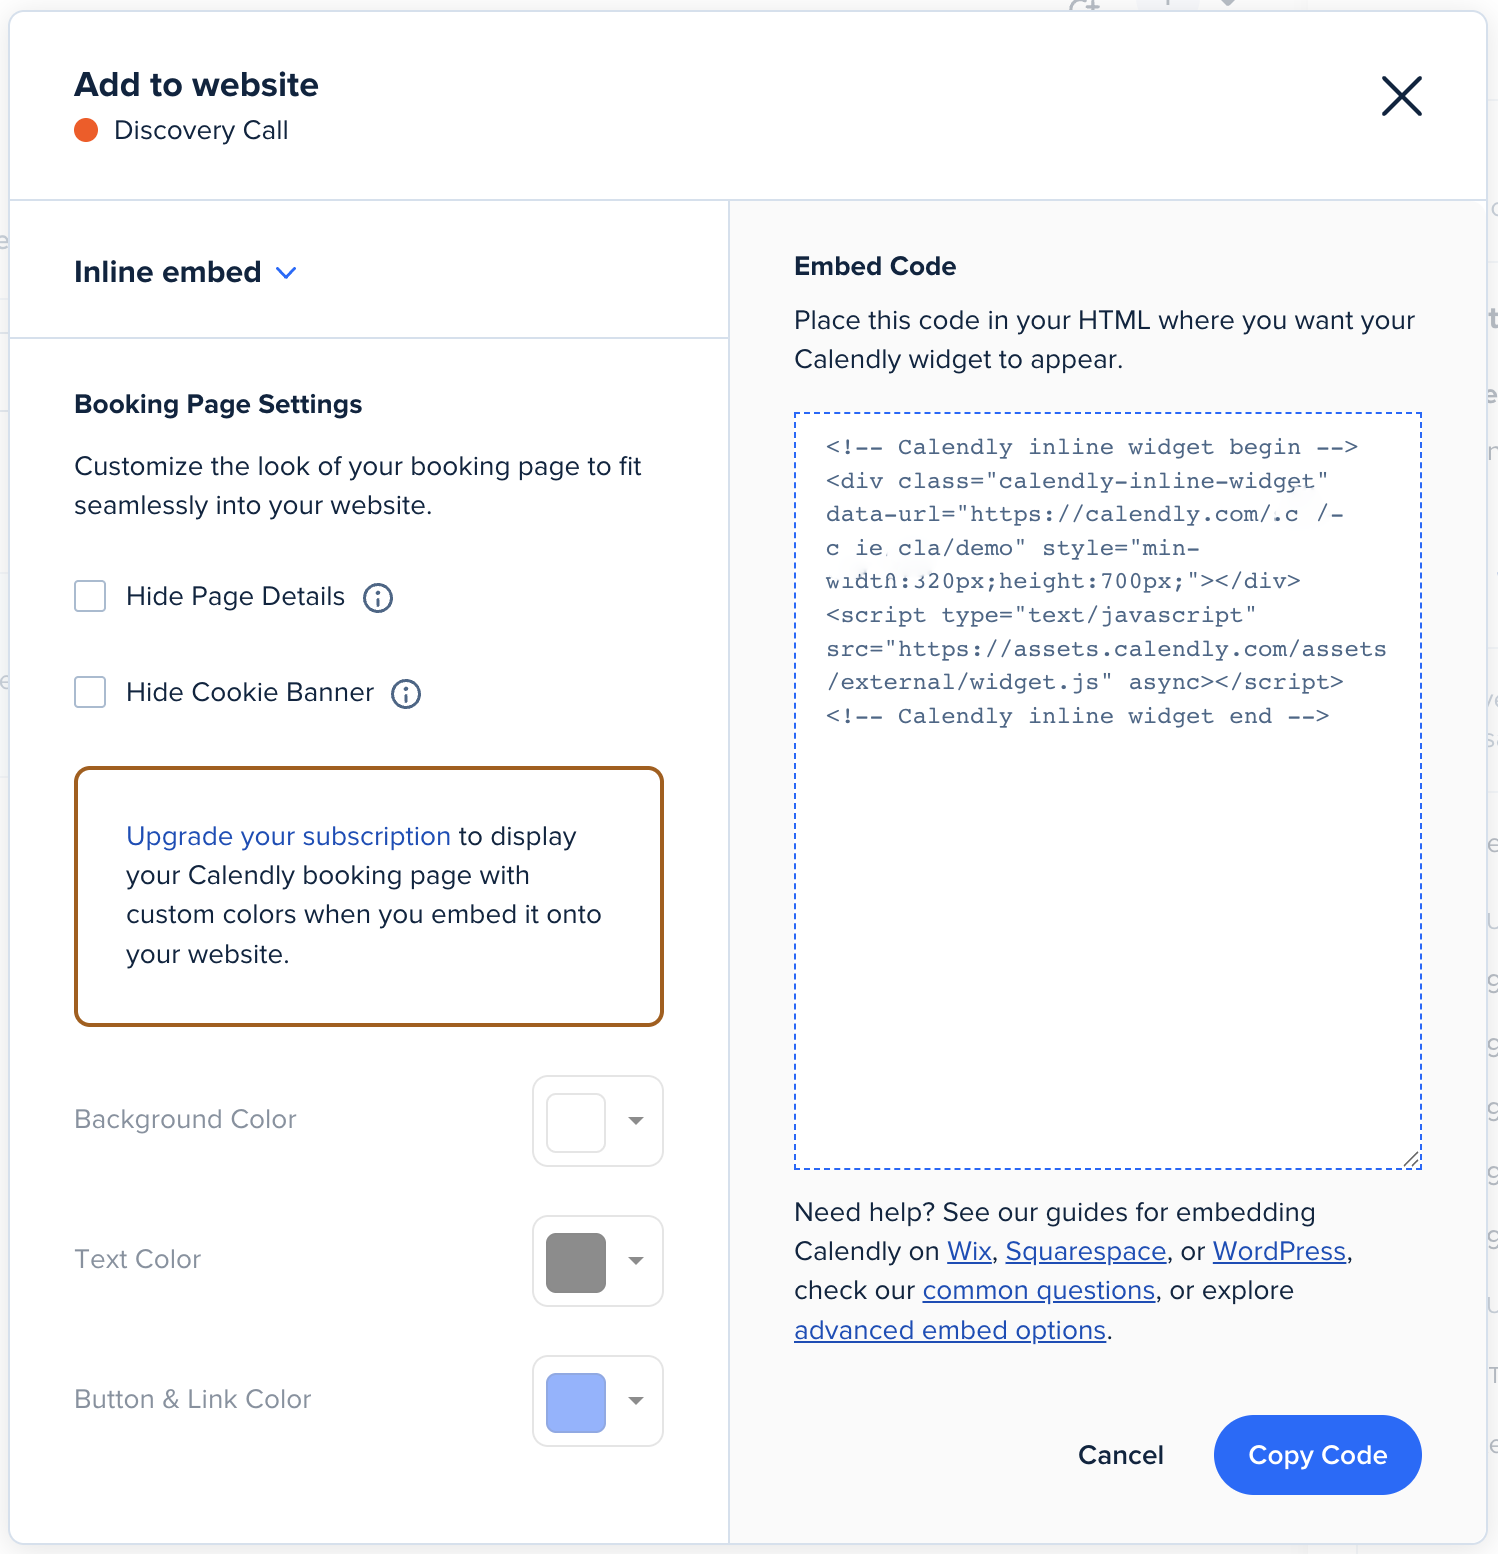
Inline embed
Pop-up widget
Pop-up text
Pop-ups can be tempting because they look tidy at first. Still, pop-up blockers are common, and I don't like relying on something the visitor's browser might block. Because of that, I recommend an inline embed for Squarespace most of the time.
The inline embed places the scheduler directly on your page, so the visitor sees available times immediately. It's also easier to design around because you can control the spacing with Squarespace blocks.
To choose it, I select Inline embed, then click Continue.
If you want Calendly's official instructions too, you can compare what I'm doing here with Calendly's guide to adding Calendly to a Squarespace site. I still prefer the inline embed approach for most service sites because it keeps the experience straightforward.
Booking page settings I turn on before copying code
After you choose inline embed, Calendly shows the embed code, plus some settings on the left. On a Squarespace site, there are two settings I recommend in particular:
Hide the cookie banner: Squarespace already has its own cookie banner option, so I don't want a second one showing inside the embed.
Hide page details: This cleans up the embedded scheduler. Then I can add the context (like pricing notes or what happens next) using Squarespace text blocks, which usually looks nicer.
On the free plan, you won't be able to update colors inside Calendly. That's fine. Most people care more about how easy it is to book than whether the button matches your exact hex code.
Once those settings look good, I click Copy code.
Now I'm done on the Calendly side, and I move over to Squarespace.
Step 3: Add the Calendly code block to your Squarespace page
This is the part that feels "techy," but it's really just copy and paste. The main thing to remember is that the embed often looks strange until you resize and position it.
Prep the section on your Book a Call page
In Squarespace, I open the page where I want the scheduler to live. In my case, I'm working with a "Book a Call" page from my Sway Squarespace Template, which already has a layout set up for booking.
First, I remove the existing blocks in that section so I have a clean space. If your template uses a built-in scheduling block or placeholder content, this is where you delete it.
You should now be looking at a blank section that's ready for your Calendly embed.
Insert a code block and paste the embed code
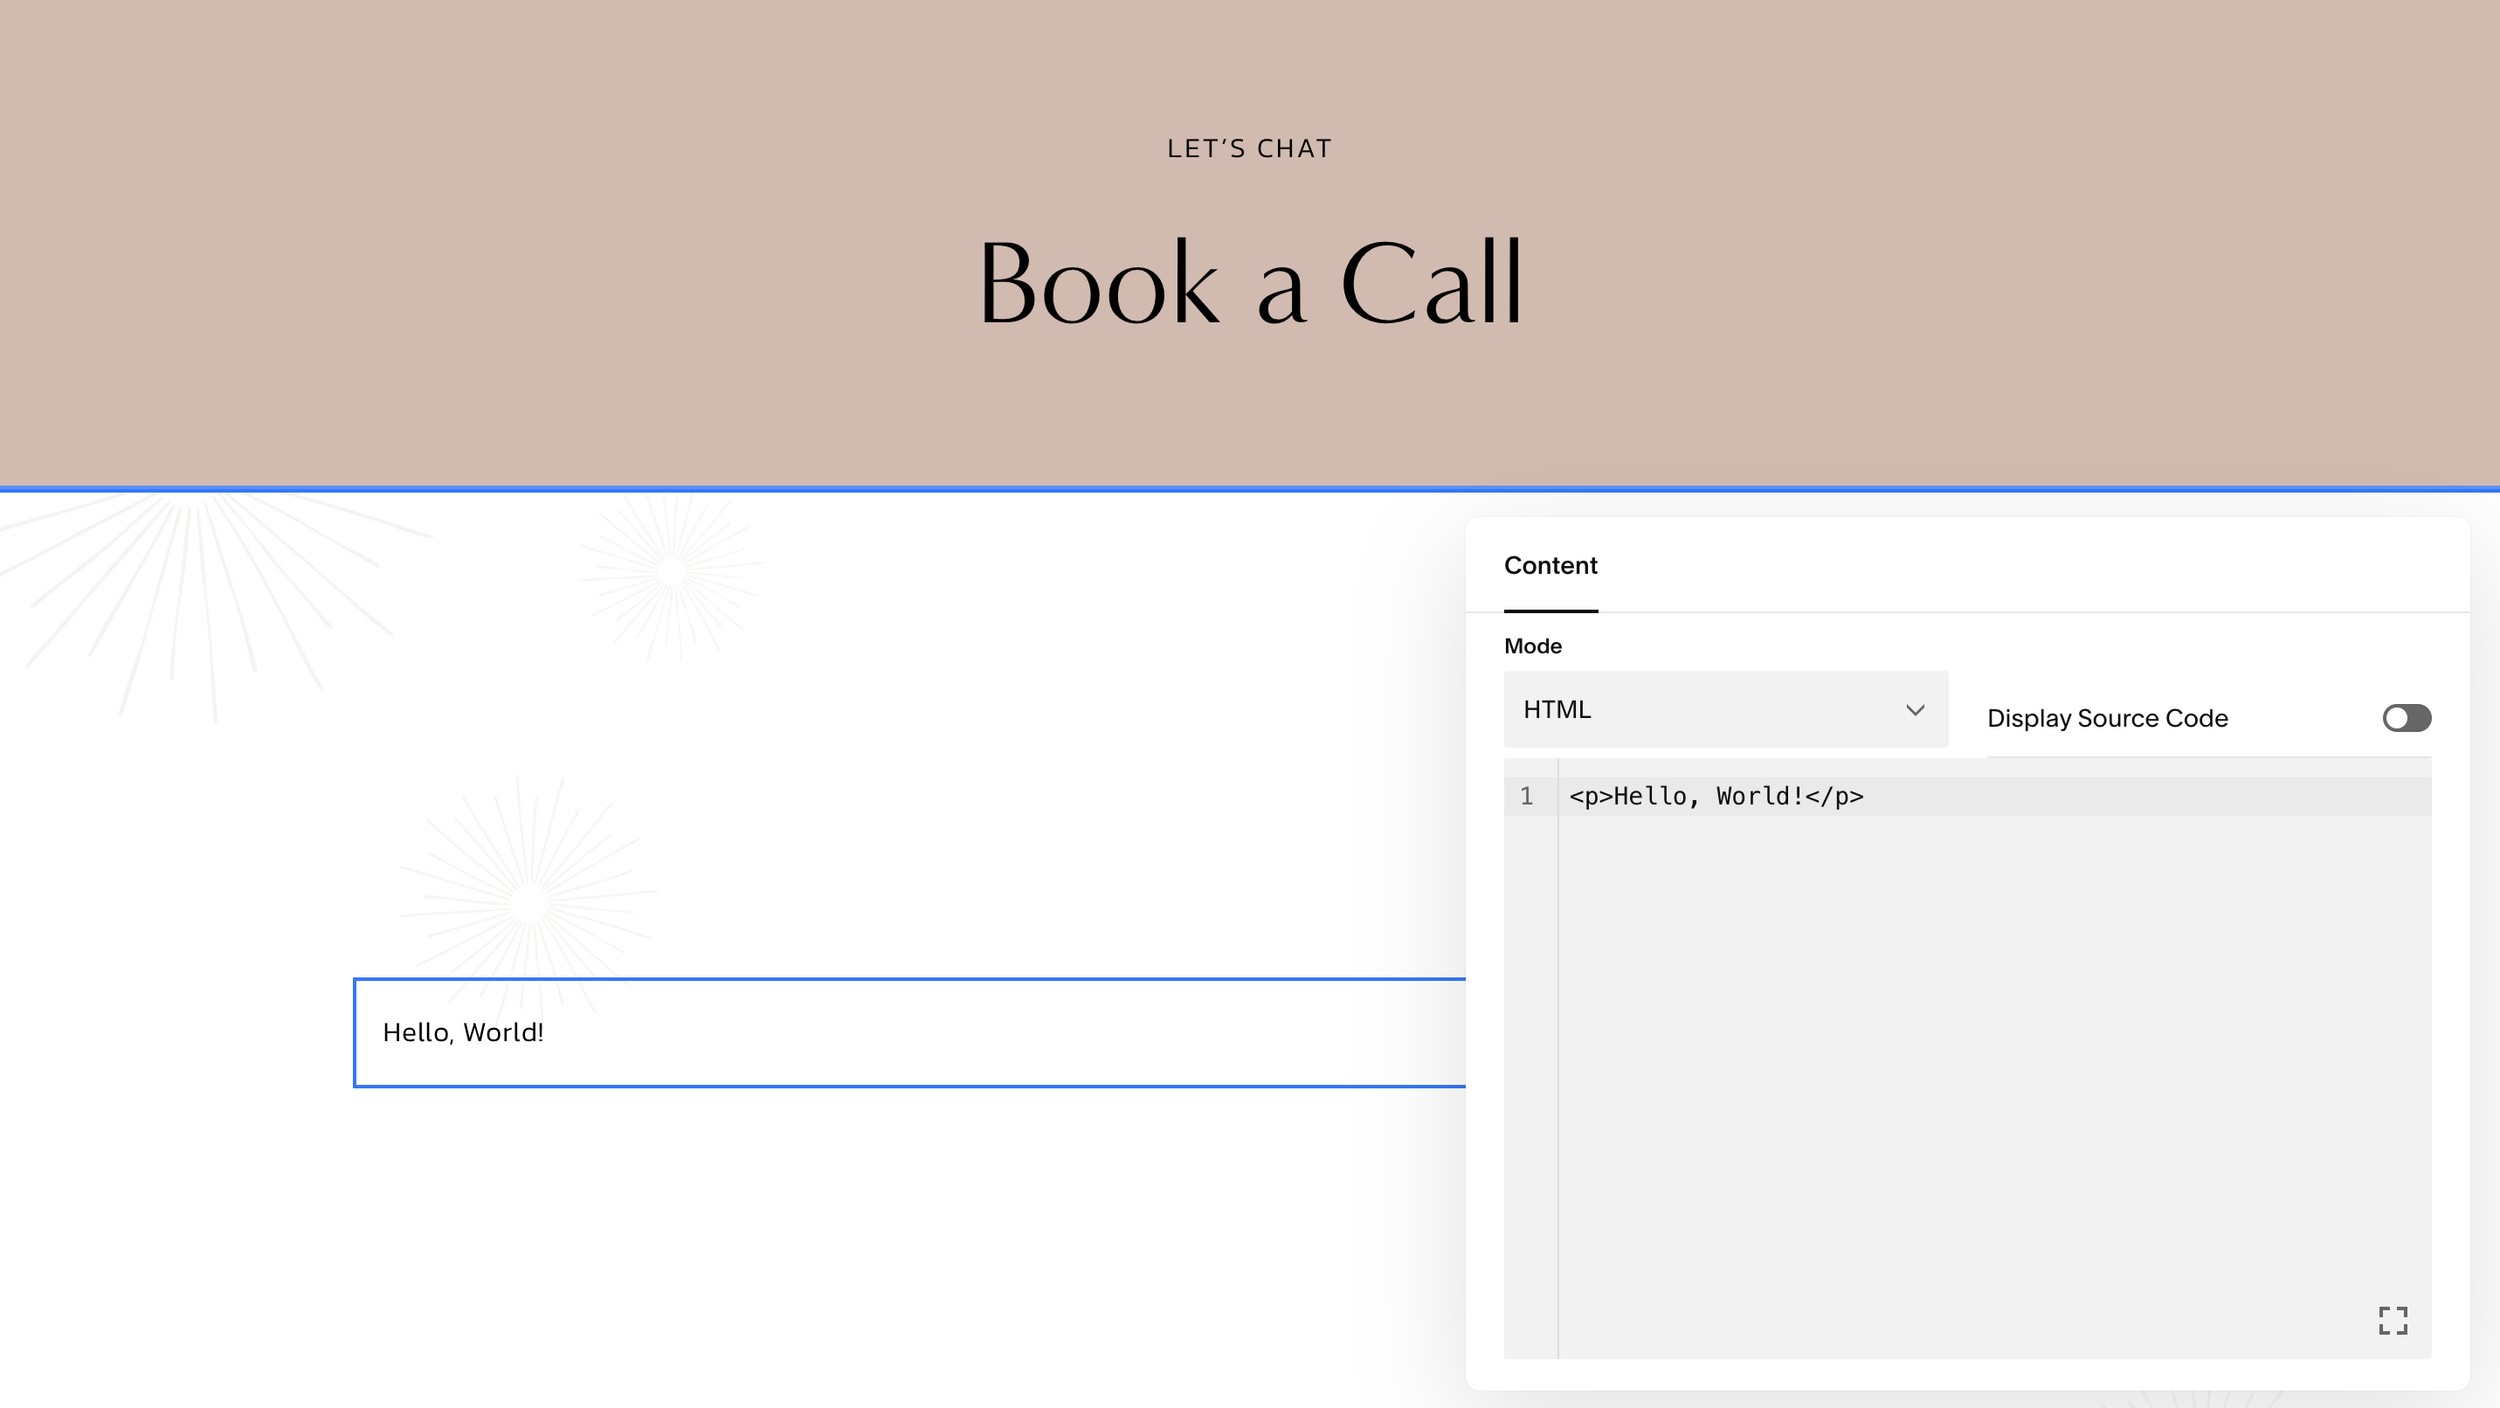
Next, I click Add Block and search for Code. Once I see the code block option, I add it to the page, then double-click the block and paste in the embed code I copied from Calendly.
At first, it's common for the embed to look tiny, pushed to the left, or just generally off. That's not a problem with Calendly. It's usually because the code block is sitting in a narrow part of the section, or it's not centered yet.
So, if it looks weird right after pasting, that's expected.
I save the page so Squarespace can load the embed properly, then I move on to positioning.
Position and style the embed so it looks intentional
Once the code block is on the page, I drag it to the right spot and make it wider. I like turning on the Squarespace grid to help with alignment. On my computer, I press G to toggle the grid on, which makes it easier to center things.
From there, I:
Widen the code block so the scheduler has room to breathe.
Nudge it up or down if the spacing feels off.
Add a text block above the embed with a clear headline, like "Book a free discovery call today."
Remove extra padding by double-clicking the little spacing handle (that "nub") between blocks.
That headline does a lot of work. It tells the visitor exactly what they're about to do, and it keeps the embedded scheduler from feeling like it appeared out of nowhere.
After that, I click Save and Exit, then preview the page.
Step 4: Preview on desktop, then fix mobile ordering (this matters)
A booking page can look perfect on desktop and still feel broken on mobile. Because so many people browse on their phones, I always do a quick mobile check before I call it done.
Desktop preview: check size, alignment, and first impressions
On desktop, I look for three things:
First, the embed should be large enough to read without squinting. If it's too narrow, the calendar looks cramped.
Next, the embed should be centered or aligned to match your site's style. It doesn't have to be perfectly centered, but it should look planned.
Finally, the headline and any supporting text should sit close enough to the embed to feel connected, but not so close that they feel crowded.
If something feels off, I go back into edit mode and adjust the width of the code block. Most fixes here are simple drag-and-drop tweaks.
Mobile preview: make sure Squarespace didn't reorder your blocks
This is the easy-to-miss step. Sometimes, in Squarespace mobile view, the text block can get pushed below the embed. When that happens, the page reads backward. Visitors see a calendar first, then the explanation, and it just feels confusing.
If that happens, I reorder the blocks in mobile view so the headline sits above the embed again. Then I save and exit.
Be sure to check: headline first, scheduler second. If mobile flips them, I fix it before publishing.
After reordering, I double-check that the Calendly embed still fits the screen nicely and doesn't feel squeezed.
Once it looks good on mobile, the embed is ready.
Step 5: Updates, edits, and adding new event types later
After your Calendly embed is live, the good news is you don't have to repeat this process every time you tweak details.
If you update the existing event type in Calendly (like adjusting availability, changing the meeting description, or editing buffers), the embedded scheduler updates automatically on your Squarespace site. You can think of the embed as a window into that specific event.
However, if you create a new event type in Calendly (for example, another one-on-one option that's different from your discovery call), it comes with different embed code. In that case, you'll need to copy the new code and embed it on the page where you want that new scheduler to appear.
If you're still deciding which scheduling tool fits you best, I broke down the pros and cons in Acuity vs Calendly vs Breely. It's especially helpful if you're weighing "free and simple" against "more features built in."
Quick tips I use to keep a Calendly Squarespace booking page clean
When you want your booking page to feel easy, a few small choices make a big difference:
Use an inline embed so visitors don't get blocked by pop-up settings.
Hide the Calendly cookie banner if Squarespace already handles cookies on your site.
Hide page details and write your own intro text in Squarespace for a more polished layout.
Always check mobile view because block order can change.
Those four habits prevent most "why does this look weird?" moments.
Conclusion
Embedding Calendly on Squarespace comes down to three moves: copy the inline embed code, paste it into a Squarespace code block, then adjust the layout on desktop and mobile. After it's set up, your existing event updates automatically, so you don't have to keep re-embedding.