Everything you Need to Know about Squarespace Blog Post Settings
Where to find them, what they mean, and what you need to do for each blog post you publish.
↓ scroll to the bottom of the post for a video walkthrough
There are two different ways to access the blog post settings in Squarespace:
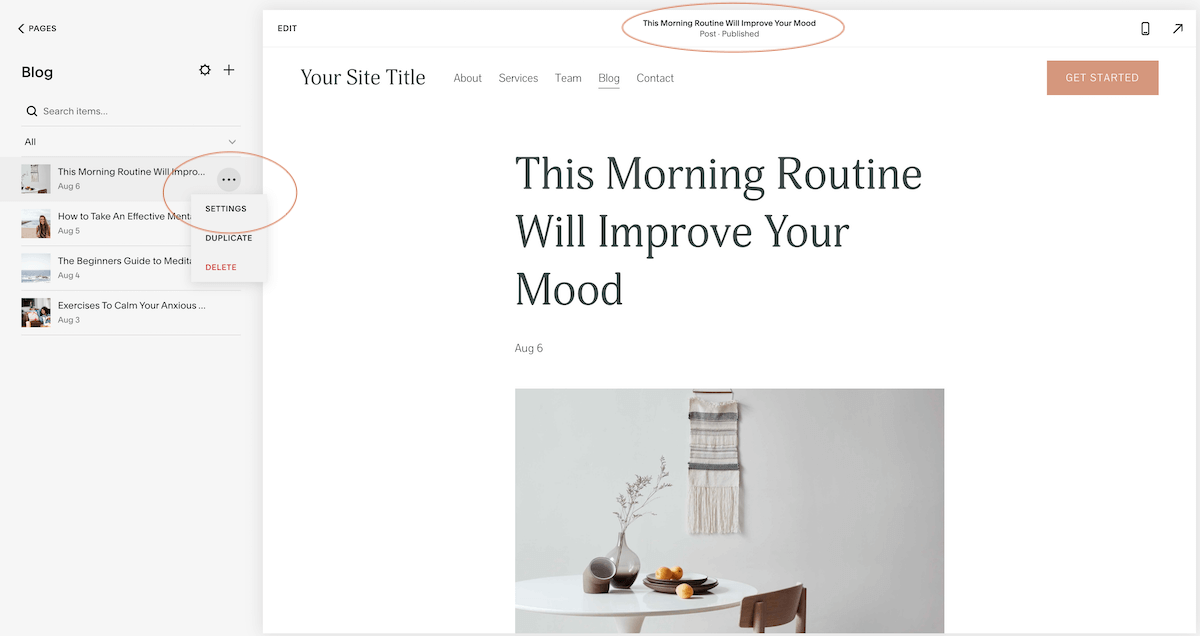
When you click on your blog in the pages menu, you can view your list of posts and click on the three dots to the right of the title to reach your post settings.
The other is when you are logged into a post and in edit mode, you can click the blog post title at the very top of the screen to reach the settings.
Update August 2021: It appears Squarespace has removed the ability to access blog post settings by clicking the blog post title. I’ll leave this option here for the moment, as sometimes they bring these back after it’s noted as a bug. But for now, use the 3 dots method.
Now, let’s dive into each of the setting options:
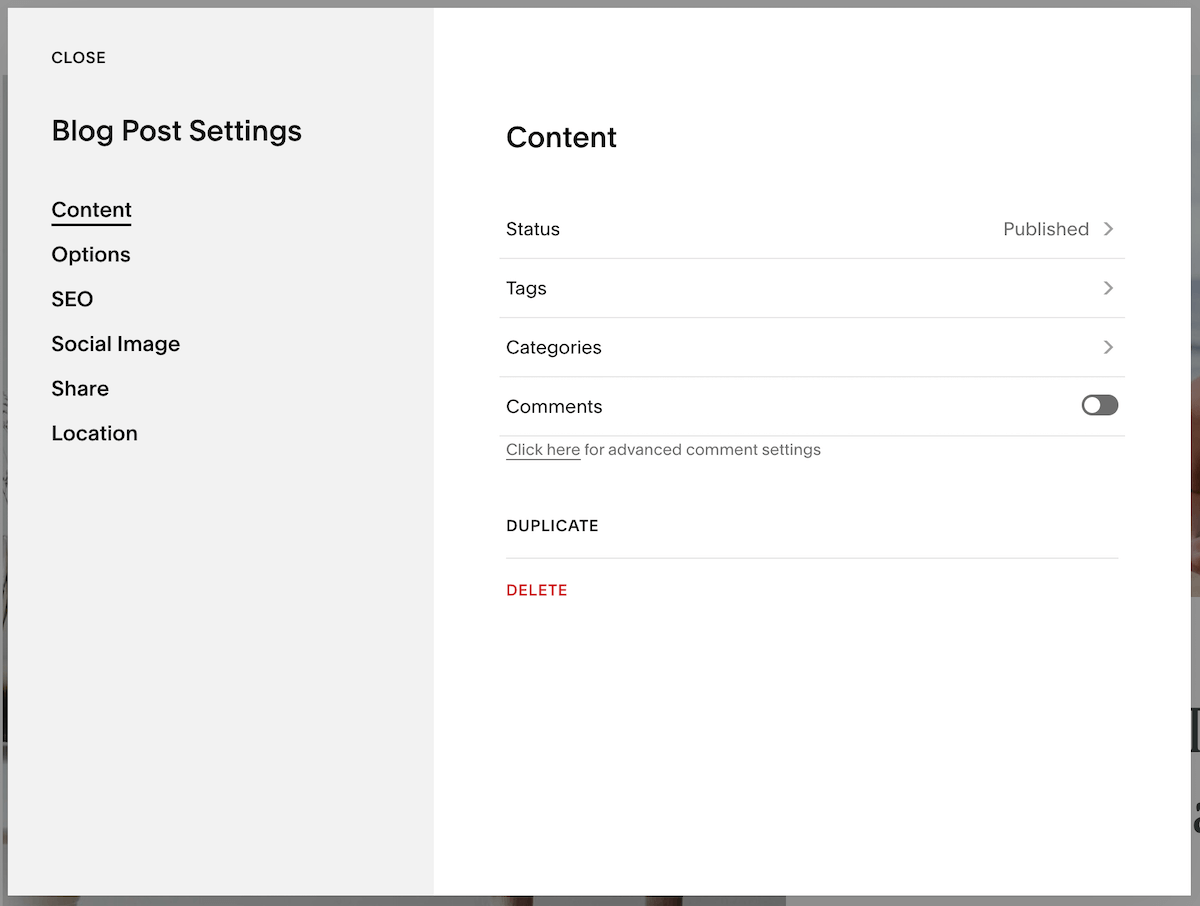
Content
Status
Status is whether your blog post is live, in a draft, or scheduled.
So if you want it to be live on the web, you'll want it to be published.
If you are working on a post and are not quite done, and you’ll want to come back and revisit it before you schedule it to publish, you can choose draft. So that saves your post as it is, but it's not live.
You can also set it to needs review. So if you're working with a team and somebody else needs to review, needs review is a good option.
Also, you can schedule a post to publish on a future date. So this is something that I do in my business. I often write more than one blog post in a sitting and I want to schedule them so they're not both going live on the same date. So what I do is I set a schedule to publish the post.
Tags & Categories
Tags and categories are ways to organize your blog.
Content tags are really detailed things. So for example, if you were writing blog posts about recipes, then your tags could be some of the ingredients like carrots and broth.
Categories are the larger buckets that your posts would fall into. So your categories might be entrees or snacks or drinks. You use these to organize your blog posts so that if someone is interested in coming and looking at entrees, they'll click the entrees category and they can see all posts about entrees.
A quick note here, I always hide the category pages and the tag pages from search. Otherwise, Squarespace creates a page for every tag you use in every category you use. And from what I've read, it seems like that actually can harm your SEO. You can do this in your Blog page settings (in the page menu, click the cog icon beside your blog and go to SEO. Scroll down to toggle hiding on for category and tag pages.

Want to learn more about how to make money with your Squarespace blog?
This self-paced course is perfect for anyone who has a blog on Squarespace or is interested in starting one.
Comments
You can allow comments on individual blog posts. First, you’ll need to turn on blog comments globally in Settings > Blogging. Next, you can choose to enable comments on a post.
Duplicate
You can also duplicate a blog post. So if you have a blog post that you're using as a template, you can duplicate it and just switch out the text and images and update the settings.
Delete
If you want to delete the post, you could do that here as well. To find deleted posts, look at the blog post list and underneath there is a recycle bin. If you click the bin, you can choose to restore deleted posts up to 30 days after you remove them.
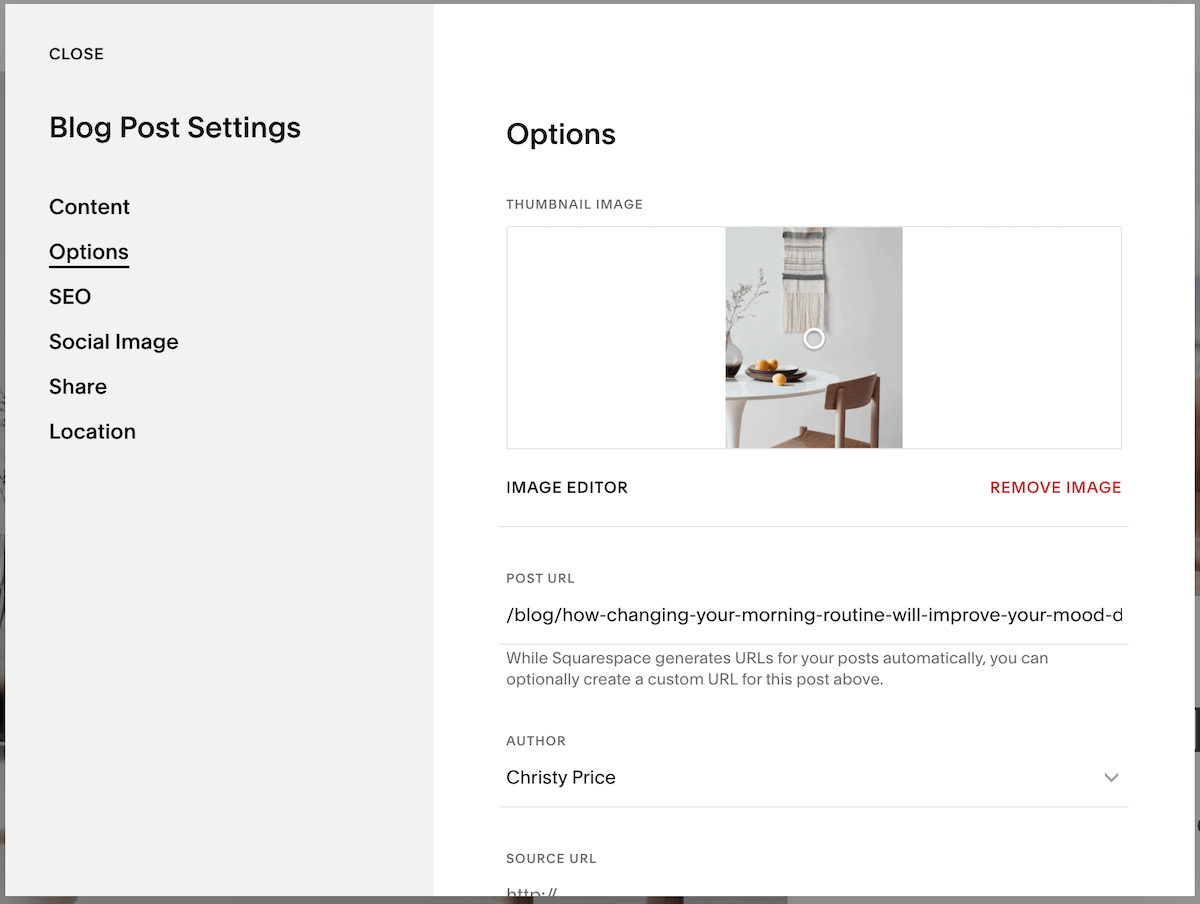
Options
Thumbnail image
For your blog post, you'll want a thumbnail image.
This is not necessarily an image that's in your post; rather, it’s an image that you upload specifically to be the thumbnail. This is the image that appears on the main blog page.
post url
Squarespace automatically uses your blog post title as your URL. I usually shorten this URL, as Google prefers URLs that are shorter and make more sense than ones that are crazy long or have nonsense characters in them. Include your keywords and I typically choose between four and six words separated by dashes.
author
Author. The author defaults to whoever is logged in and starts the post. But if you have other contributors on the site, you can change the author name to one of those.
source url
Source URLs are used if you are pulling a post from somewhere else on the web.
You can also choose to skip your post altogether by having the blog post title on the main blog page link out to the source. (I almost never use these.)
Excerpt
The excerpt is a short usually one-sentence summary of what you're talking about, and you can set it to appear on the main blog page.
Featured post
You have the option of making any post a featured post. This comes into play when you are using a summary block in Squarespace. A summary block pulls in collections like blog posts and you can set it to display featured posts. I use one at the top of my main blog page.

SEO
SEO TITLE AND DESCRIPTION
This is where you can encourage Google to serve up a specific title and description for your blog posts in search results. I typically leave the title off and just let Google pull the title from my blog post. But in some circumstances, you may want to switch out and have an SEO-specific title. For SEO description, I write a summary using the keywords I'm using in my post and make it compelling for someone to click through to my post.

Social Image
If you share your blog posts on social media an image often appears with the post title - a great example of this is when you share a blog post link on Facebook:

The image that is shared is the blog post thumbnail but if you want it to be something else, you can add a different image here to be your alternate social sharing image for this particular post.

Share
Create email draft
You can easily start an email featuring this blog post with one click to create an email draft. In Marketing > Email Campaigns it will automatically start an email in the drafts folder for you to send out to your mailing list.
Connect Account
In addition to creating an email draft, you can also connect social media accounts to allow Squarespace to push information to or pull information from those accounts. I personally don't use this feature because I like a little bit more control over how those posts are shared on social media.
But if you want to try this out, you could hook up Facebook for example, and just have it push out your post to Facebook when you publish it here. I personally prefer a little more control over social sharing, so I use Missinglettr to schedule my posts instead of the direct Squarespace integration.

Location
ADDRESS
If you have a brick-and-mortar location you can choose to include that information here, although only a few older Squarespace templates actually show the location on the blog post.
Video Walkthrough
→Start with my favorite Squarespace template: Clove
→I use Missinglettr to share posts to social media
If you found this post helpful you can check out 3 Steps to Level up your Squarespace Blog.