How to Style a Squarespace Newsletter Block with a Full Width Image Background to Automatically Appear on Every Page
This tutorial is for the most popular template family, Brine, in Squarespace 7.0, so this hack will work with any Brine family templates like Basil, Burke, Foster, Impact, Mentor, Moksha, Rally, Wav, and a whole bunch more. In the video walkthrough at the bottom of this post, I’ll be working in the Rally template.
For the Pacific template, the code is different (it’s a whole other ballgame), so read through the instructions here, but substitute the code at the end of this post.
We’ll be uploading a background image for our newsletter block and will use Custom CSS to hack our footer so it appears full width on every single page of our site.
With this trick, you’ll be able to have a beautiful newsletter sign-up at the bottom of each page of your site. And if you want to update it, you only have to update it in one place - the footer - and you’ll see the changes on every page.
Brine family templates have footers split into 3 sections… top, middle, and bottom. In this tutorial, we’ll be using the top footer section for our newsletter.
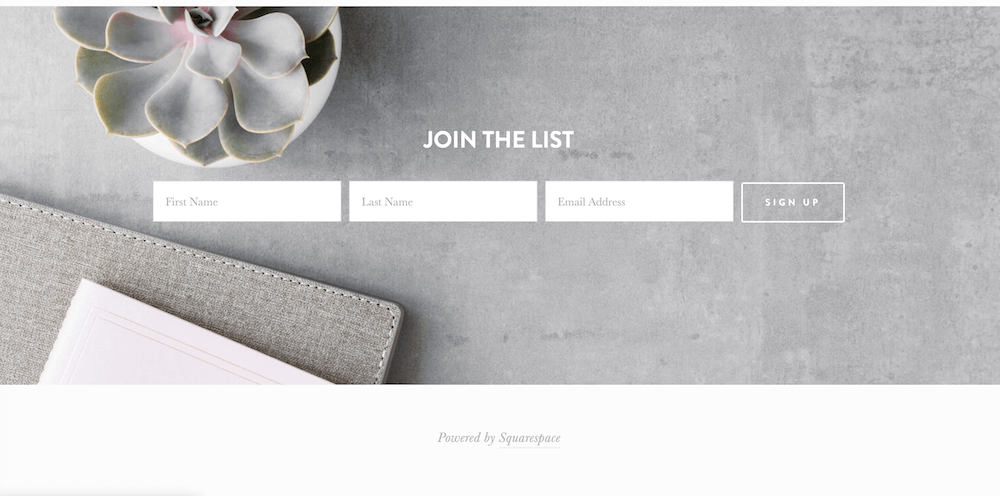
Create a beautiful newsletter block that appears on every page of your Squarespace website to get email sign-ups.
STEP 1
Start by adding a newsletter block to the top footer section (Footer Top Blocks) and save your work.

STEP 2
Next, we’ll paste this code into Design > Custom CSS.
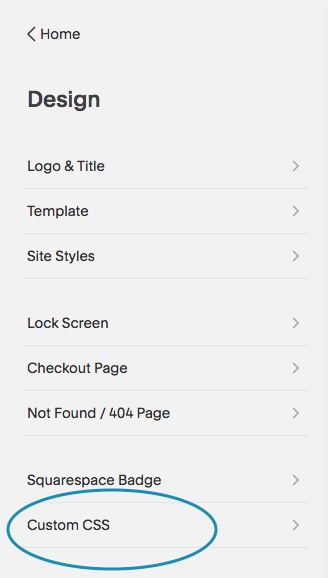
Design > Custom CSS
/* add custom image behind newsletter subscription block in footer */
.Footer-inner {
     max-width: 100%!important;
     padding: 0 0;
     overflow: hidden;
}
    .Footer-blocks--top {
 background-image: url('image-url-here') !important;
      background-size: cover;
   padding-top: 55px;
   padding-bottom: 0px; }
The first part of this code, tells Squarespace that we want our block to be full bleed, from one side of our site to the other, with no padding. Then we’ll add in our code for the background image, which we will upload in a moment, and you can see that it is set to background-size cover, which means that it will expand to fill the space and not repeat. You can also play with the padding of your image top and bottom to make the spacing match the rest of your site.
If you would like to add back some padding to the middle and bottom sections of the footer, add this code below the code you already pasted and play around with the padding numbers:
#footerBlocksMiddle, #footerBlocksBottom {
    padding-left: 40px; padding-right: 40px;
}
STEP 3
Our next step is adding our background image to Squarespace and we can do that in the Custom CSS panel by clicking Manage Custom Files. Before you upload your image, make sure to optimize the image for file size and file name to improve your SEO ranking and user experience.
STEP 4
Next, there is a shortcut to add the image URL to our custom code. You’ll highlight the text in between the single quotes that says image-url-here, delete it but leave your cursor, then click the image filename you just uploaded. You’ll notice that the url is updated in your code and now you can save your Custom CSS. One thing I noticed is that some editors paste in the single quotes incorrectly and your background image will not show up. If that happens to you, edit your single quotes directly in the Custom CSS window.
STEP 5
If you are seeing a color block behind the newsletter block, update the background in Design > Site Styles. Click on our Newsletter block to pull up the relevant styles and we can change the background color and opacity here. (You may need to do this for alternate background color.)
Now you have a beautiful newsletter block that appears automatically at the bottom of each page of your website.
If you are interested in more customizations for the newsletter block, such as matching the button style to other buttons on your site, changing the title font size and color, or changing the size of your post-submit message, check out these posts:
Video Walkthrough
Adding a pre-footer background image in Pacific
For the Pacific template family (Bryler, Charlotte, Fulton, Horizon, Naomi, Pacific), you’ll want to paste in this code instead. It adds the background to the prefooter area specific to that template:
/* add custom image behind newsletter subscription block in prefooter */
#preFooter {
background-image: url('image-url-here') !important;
background-size: cover;
padding-top: 55px;
padding-bottom: 0px; }