How to Customize your Navigation in Squarespace 7.1

Note: these steps are for Squarespace 7.1 only. They don’t work for older templates.
Keep reading for more tips and CSS code hacks ↓
Step 1. Change the Font
You can change the navigation font without any custom code.
Go to Design > Site Styles > Fonts. Then select Assign Styles and choose Site Navigation.
Change the style to Custom, then make any adjustments to the font, weight, style, spacing, and size.
Step 2. Change the color
This is kind of a weird one. If your header is set to transparent so it overlays the content of your website (Edit Site Header > Colors), the header inherits the color theme of your first page section. So, if your first section is White Minimal, your navigation color on that page is pulled from the White Minimal section theme. If on a different page your first page section is Black Minimal, then the navigation on that page will be a different color pulled from the Black Minimal section theme.
If your header is NOT set to transparent, you can choose the color specifically for your header under Edit Site Header > Colors.
To change the navigation color, go to Design > Colors then click Section Themes. Now you’ll be able to see the color labels on each section of your website page.

Click the pencil icon next to the color theme showing in the header. Then you can edit the Navigation Link color.
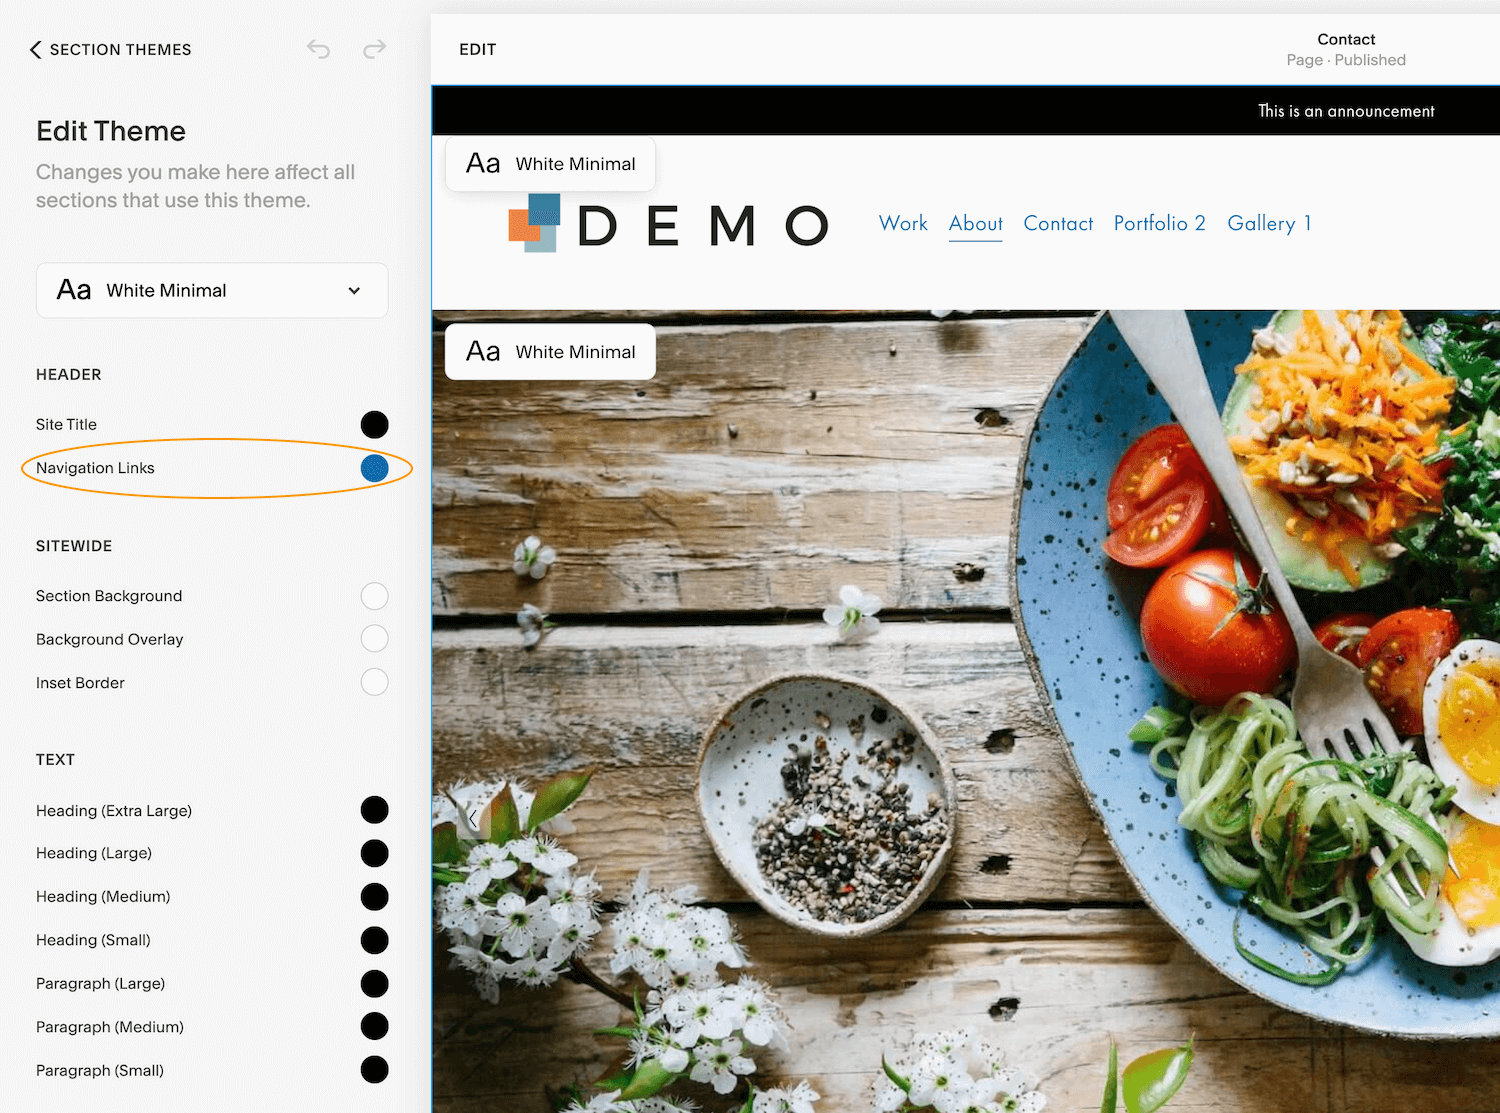
If your header is transparent, you’ll need to do this for each section theme you use at the top of a page.
Step 3. Edit the Site Header Settings
When you are in Edit mode and roll over your Site Header, you can choose to make global changes or make specific tweaks to your desktop or mobile view.
Global Styles

Under Site Title & Logo, upload your site logo as well as a separate logo for mobile if you’d like, then size them appropriately.
In Elements, choose to hide or show your social icons*, a button, and your shopping car.
In Colors, you can make your header transparent (overlaying your first section) or choose the Color Section Theme you’d like it to have.
Finally, you can set your header to be Fixed Position (“sticky”) and show it at all times or just when you begin to scroll back up the page.
* If you are looking for a way to add social icons that aren’t included in Squarespace, I have a workaround in the blog post Show different social links or icons in Squarespace (walkthrough video)
DESKTOP Styles
In Header Layout, select the layout of your logo and navigation on desktops and laptops.
Choose to make those items the width of your screen or inset.
Vertical Padding is the space above and below your header.
Element Spacing is the distance between your navigation items and social icons or cart.
Link Spacing allows you to adjust the space between each navigation link item.
MOBILE Styles
In Header Layout, select the layout of your logo and navigation on mobile devices.
Under Overlay Menu, adjust the alignment of your navigation links and the spacing between them. Then set the color palette for mobile view.
Then select the mobile menu icon you’d prefer. The three equal lines (the hamburger menu) is the gold standard.

Step 4. Change the Pages in Navigation
You’ll do this from the Pages menu. You can view the pages in your navigation under Main Navigation. Simply drag and drop these to reorder, click the + sign to add a new page, or drag existing pages from Not Linked to Main Navigation to add them to your nav bar.
You can choose to include your Home page under Main Navigation if you want it to show up in the navigation. Otherwise, if the Home page is under Not Linked, site visitors can click the logo or site title in your header to visit the Home page.
Step 5. Take it Further
Want to remove the navigation underline that designates an active page? Add this code to Design > Custom CSS:
/* change header nav active style */
.header-nav-item--active a {
  background-image: none !important;
}
What about removing the navigation underline AND adding a color effect to designate an active page? Use this code instead, changing out color hex code to match the style of your site:
/* change header nav active style */
.header-nav-item--active a {
  color: #990000 !important;
  background-image: none !important;
}
Want your navigation links to fade on hover? Add this code and change the color hex code to get the fade effect you want:
/* add header nav hover effect */
.header-nav-wrapper a:hover {
color: #000099 !important;
}
→ You can also read about the CSS I always add to sites with dropdown menus.
Level up your site even more!
Add a Split Navigation
Transform your Squarespace navigation with this easy to install plugin. Split your navigation to either side of your logo or site title.

Add a Secondary Navigation
Add a secondary navigation above or below your header, either on a single page or site-wide with this plugin.

Add a Mega Menu
Want to take your navigation next-level? Create a mega menu.
